The anti-tragus is one of those piercings people fall in love with before they know its name. You spot it on someone’s ear, that small curved stud or snug hoop sitting just above the earlobe, and you want it. Then you sit in my chair and ask the real questions: will it hurt, how long until it settles, and why does everyone online seem to disagree about the healing time. I have placed a lot of these over the years, and I want to give you the version I give clients in person, without the scare stories and without the sugar-coating.
The anti-tragus is a genuinely rewarding placement, but it is also one of the more particular cartilage piercings to live with while it heals. The anatomy is small, the angle matters more than most people realize, and the wrong jewelry choice early on is the single most common reason these run into trouble. This guide walks through all of it: where the anti-tragus actually sits, what the pain is honestly like, a realistic healing timeline, the jewelry that works versus the jewelry that causes problems, and how to tell a normal healing bump from something that needs attention.
What Is the Anti-Tragus, Exactly
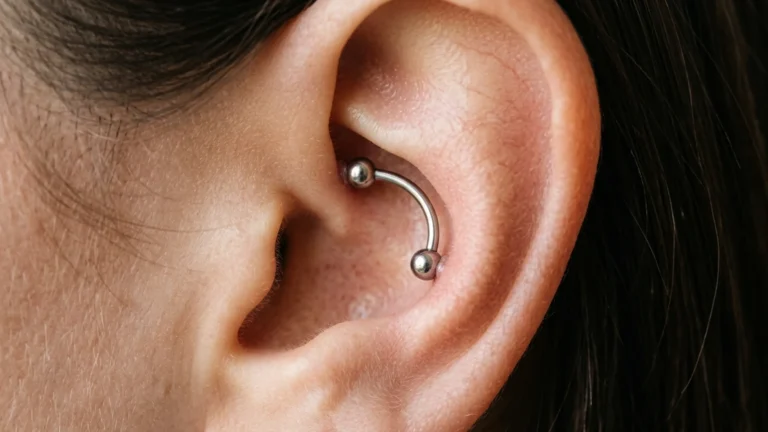
Your ear has more named ridges than people expect. The tragus is the little flap of cartilage that points back toward your face and partly covers the ear canal. Directly across the notch from it, rising up off the top edge of your earlobe, is a smaller mirror-image ridge. That ridge is the anti-tragus. An anti-tragus piercing passes through this raised lip of cartilage.
This matters because the anti-tragus is small and its shape varies a lot from person to person. Some people have a pronounced, well-defined ridge that takes a piercing beautifully. Others have a flatter, shallower anti-tragus that a responsible piercer may decline to pierce, or may pierce only with a specific jewelry style. This is not a placement where anatomy is universal, which is why a reputable studio will look at your ear and tell you honestly whether it suits the piercing. If a piercer glances at your ear and says yes to everything without examining it, that is a small red flag.
Because it is cartilage rather than the soft fatty tissue of the lobe, the anti-tragus behaves like its cartilage cousins, the helix, conch, and tragus. Cartilage has limited blood supply, which is the core fact that explains nearly everything about how this piercing heals. If you want the full map of where every ear piercing sits, our overview of the different types of ear piercings shows how the anti-tragus fits alongside the rest of the ear.
Does an Anti-Tragus Piercing Hurt
Here is the honest answer: it is a real pinch, sharper than a lobe, on par with or slightly above most other cartilage piercings. On the informal one-to-ten scale that clients always ask about, most people land it around a five or six. The anti-tragus cartilage tends to be a touch denser than the tragus, so the pressure of the needle passing through can feel more pronounced.
The important thing to understand is that the pain is brief. The actual piercing takes a fraction of a second. What you feel afterward is a warm, dull throb for the rest of the day, sometimes a little tenderness when you lie on that side at night. That is normal and it fades. Pain tolerance is deeply personal, and where any given piercing falls on your own scale depends on your anatomy and your nerves that day. If you want a placement-by-placement comparison before you commit, our breakdown of how the ear ranks from least to most tender is worth a read; you will find the anti-tragus sits in the moderate band, well below the snug and industrial.
A note on numbing creams, because someone always asks. Topical lidocaine creams sold over the counter do very little for cartilage piercings. They are formulated to numb the skin surface, and a piercing needle passes well below that. Most professional piercers do not use them, and some studios will not pierce over a freshly applied cream because it can affect the tissue. The better strategy is to eat beforehand, stay hydrated, and breathe slowly through the actual piercing. A good piercer talks you through it in a few seconds.
Healing Timeline: The Part Everyone Underestimates

This is where I have to be straight with you, because the internet loves to quote a tidy number and cartilage does not cooperate with tidy numbers. An anti-tragus will feel settled and look healed on the outside in roughly two to four months. It is not actually done healing then. Full healing, the kind where the channel is fully matured and you can safely change jewelry without trouble, typically takes somewhere between six and twelve months.
The reason is blood supply. Cartilage receives far less circulation than the fleshy lobe, and circulation is what carries the cells and nutrients that close and strengthen a piercing channel. Less blood flow means slower, more fragile healing. This is not a flaw in your body or a sign you did something wrong; it is simply how cartilage works. The Association of Professional Piercers is clear that cartilage placements need patience and that rushing them is the most common self-inflicted setback.
Here is a realistic stage-by-stage picture so you know what normal looks like.
Weeks 1 to 2: Tenderness, mild swelling, maybe some clear or pale yellowish crust around the jewelry. The crust is dried lymph fluid, not pus, and it is part of normal healing. Sleeping on that side is uncomfortable.
Weeks 3 to 8: Swelling settles. The piercing may still be touchy if knocked. This is the window where irritation bumps most often appear, usually from sleeping on it, snagging it, or aggressive cleaning.
Months 3 to 6: It looks and mostly feels healed. The temptation to change jewelry peaks here. Resist it unless your piercer confirms the channel is ready. The inside is still maturing.
Months 6 to 12: Full maturation. Jewelry changes are safe, and the piercing tolerates daily life without flaring up.
Because the anti-tragus heals on a similar clock to its neighbors, the same patience you would give a tragus applies here. Our deeper dive into how long ear piercings take to heal covers the biology in more detail if you want it.
Aftercare That Actually Helps
Aftercare for the anti-tragus is refreshingly simple, and simple is exactly the point. The single most evidence-backed practice is sterile saline. Spray or soak the piercing with a sterile saline solution two to three times a day, gently pat it dry with clean disposable paper, and otherwise leave it alone. That is the whole routine. The Association of Professional Piercers and most clinicians converge on this same minimalist approach for a reason: the piercing heals best when you support it and stop interfering with it.
A few specifics that matter for this particular placement:
- Use sterile saline, not a homemade salt soak. Pharmacy sterile wound-wash saline is consistent and gentle. A scoop of table salt stirred into tap water is unmeasured, often too strong, and can dry out and irritate the tissue. If you ever do mix your own, the standard is a quarter teaspoon of non-iodized sea salt to a cup of warm distilled water, but bottled sterile saline removes the guesswork.
- Do not twist, spin, or pick at the jewelry. The old advice to rotate jewelry is outdated and harmful; it drags crust and bacteria through the healing channel and tears the new tissue.
- Mind your sleep. The anti-tragus sits right where your head meets the pillow. Sleeping on it is the leading cause of irritation bumps. A travel pillow or a clean folded shirt can take the pressure off.
- Headphones and earbuds are the hidden enemy. Over-ear headphones press the front of the jewelry; earbuds press the back. During the first few months, give your ears a break or switch to the other side.
- Avoid submerging it. Pools, hot tubs, lakes, and the ocean all carry bacteria that a fresh piercing cannot defend against. Keep it out of standing water until it is well along.
Skip the alcohol, hydrogen peroxide, tea tree oil, and antibacterial ointments. They are too harsh for a healing piercing and can kill the cells you are trying to grow. For a fuller treatment, the saline routine we describe for the closely related tragus piercing applies almost identically to the anti-tragus.
Jewelry: The Single Most Important Decision

If you take one thing from this guide, make it this: the jewelry you start with determines how smoothly your anti-tragus heals. Get it right and the piercing is uneventful. Get it wrong and you invite migration, irritation, and bumps.
The anti-tragus is almost always pierced at 16 gauge, which means jewelry with a post about 1.2 millimeters thick. A skilled piercer leaves a little extra room on the initial jewelry to accommodate the swelling that comes in the first couple of weeks.
Here are the realistic jewelry options and where each one belongs in the timeline.
Curved Barbells
A small curved barbell, sometimes called a banana barbell, is the workhorse starter for an anti-tragus. Its gentle curve follows the natural shape of the ridge, sits low against the ear, and is less prone to catching than a hoop. For most anatomies this is the safest first jewelry.
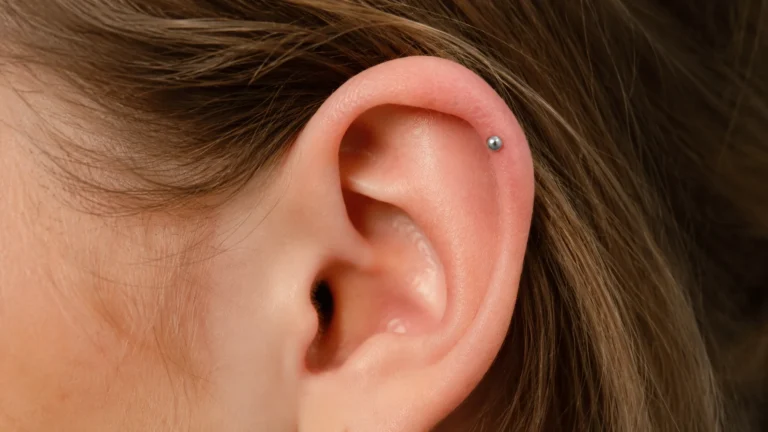
Flat-Back Studs (Labret Studs)
A flat-back stud has a smooth disc that rests against the back of the ear and a decorative front. The flat back is comfortable and snag-resistant, which is why it is a favorite for healing cartilage. A simple gem or bead on the front gives that subtle look people love. This is an excellent starter option when the anatomy suits a straight post.
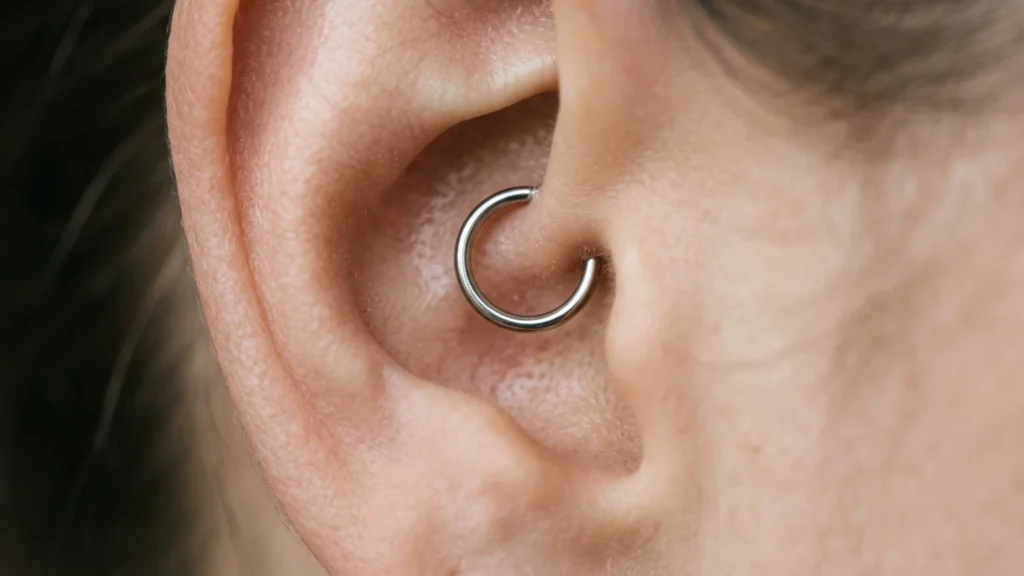
Hoops and Rings
Seamless rings, clickers, and captive bead rings look fantastic on a healed anti-tragus, and they are the look most people are chasing. The catch is that a hoop moves more, catches more, and is much easier to bump in a placement this exposed. Hoops belong on a fully healed anti-tragus, not a fresh one. Wait the full healing window before you switch.
On material, do not compromise. Implant-grade titanium is the gold standard for a fresh piercing: it is hypoallergenic, holds an anodized color well, and is the metal least likely to provoke a reaction. Implant-grade steel is acceptable for many people but contains nickel, which a meaningful number of people react to. Solid 14-karat or higher gold is also safe; gold-plated jewelry is not, because the plating wears and exposes whatever is underneath. The Association of Professional Piercers maintains clear standards for initial jewelry, and a quality studio will stock to them.
The table below summarizes the practical jewelry guidance for an anti-tragus.
Cost and Choosing a Piercer
An anti-tragus piercing typically runs somewhere in the range of forty to seventy dollars for the piercing service in the United States, with the jewelry priced separately and often making up the larger share of the total. Implant-grade titanium and solid gold cost more than steel, and they are worth it for a piercing you want to keep. Be wary of a price that seems too good; cheap jewelry is the most common hidden cost, because you will pay later in irritation and replacement.
Choosing the right piercer matters more for the anti-tragus than for a simple lobe, precisely because the anatomy is variable and the angle is unforgiving. Look for a studio that pierces with a single-use sterile needle, never a piercing gun. Guns cannot be fully sterilized, crush cartilage rather than cleanly piercing it, and have no place anywhere on the ear above the lobe. A good piercer is happy to show you their autoclave, their single-use setup, and their portfolio, and will tell you honestly if your ear is not a good candidate. The Association of Professional Piercers offers guidance on how to choose a piercer that is worth reading before you book.
Troubleshooting: Bumps, Irritation, and When to Get Help
The question I hear most about the anti-tragus is some version of: there is a bump, should I panic. Usually the answer is no, but it helps to know what you are looking at.
An irritation bump is the common one. It is a small, flesh-colored or slightly pink bump that appears next to the piercing, often after you have slept on it, snagged it, changed jewelry too early, or cleaned too aggressively. It is your tissue complaining about being disturbed. The fix is almost always to remove the source of irritation and go back to basic saline care. Most irritation bumps settle over a few weeks once you stop poking the piercing.
A keloid is different and far less common than the internet suggests. A true keloid is a firm, often shiny overgrowth of scar tissue that grows beyond the original wound and does not resolve on its own. Genuine keloids have a genetic and ethnic predisposition and usually need medical treatment from a dermatologist. The vast majority of what people call keloids are actually irritation bumps or hypertrophic scarring, which respond to changing the conditions around the piercing.
Signs that warrant a visit to your piercer or a clinician, rather than home care, include spreading redness, heat radiating from the area, significant swelling, thick green or yellow discharge with a foul smell, or fever. Those point toward infection rather than ordinary irritation. MedlinePlus, the consumer health service of the National Institutes of Health, has a plain-language overview of piercing care and warning signs that is a reliable reference. When in doubt, do not remove the jewelry yourself if you suspect infection; that can trap the infection inside. Call your piercer first.
Living With Your Anti-Tragus and Building an Ear Curation
Once healed, the anti-tragus is one of the most versatile placements on the ear. It anchors the lower curve beautifully and pairs naturally with a tragus, a conch, or a stack of lobe and helix pieces in a curated ear. Because it sits low and snug, it reads as elegant rather than busy, which is part of why it has stayed popular even as trends shift.
Taking care of yourself supports healing more than people expect. Cartilage healing draws on your overall health, so the same habits that help any tissue repair, including steady protein, hydration, and rest, quietly help your piercing along. If you are leaning into a nourishing routine while you heal, plenty of people pair that intention with simple food upgrades, whether that is a stack of make-ahead plant-based breakfasts or a batch of protein-forward low-carb snacks to keep energy steady through a long healing stretch. None of that is a substitute for good aftercare, but feeling well makes the patient months easier.
The anti-tragus rewards patience. Pick a studio that examines your ear honestly, start with quality titanium in a curved barbell or flat-back stud, keep your routine boring and consistent, protect it from your pillow and your headphones, and give it the full healing window before you swap in that hoop you have been eyeing. Do that, and you will have a piercing that looks great and gives you no trouble for years.
Frequently Asked Questions
How long does an anti-tragus piercing really take to heal?
It looks settled in two to four months but is not fully healed until roughly six to twelve months. The slow timeline comes from cartilage having limited blood supply, which means it repairs more slowly than the fleshy lobe. Wait for your piercer to confirm full healing before changing jewelry, even if it looks fine earlier.
Can I start my anti-tragus with a hoop?
It is not recommended. A hoop moves and catches far more than a curved barbell or flat-back stud, and in an exposed spot like the anti-tragus that movement irritates the healing channel and invites bumps or migration. Start with a curved barbell or flat-back labret stud in implant-grade titanium, and switch to a hoop only once the piercing is fully healed.
Why does my anti-tragus piercing have a bump?
The most common cause is an irritation bump, usually from sleeping on it, snagging it, changing jewelry too early, or over-cleaning. Return to gentle sterile saline care, remove whatever is irritating it, and it typically settles over a few weeks. If the bump is firm, shiny, growing beyond the piercing, or accompanied by spreading redness, heat, or foul discharge, see your piercer or a clinician.
Is the anti-tragus more painful than a tragus piercing?
Slightly, for most people. The anti-tragus cartilage tends to be a little denser, so the pressure of the needle feels more pronounced, landing it around a five or six out of ten compared to roughly a four for the tragus. The actual piercing lasts under a second, followed by a dull ache that fades over the day. Pain is highly individual, so your experience may differ.